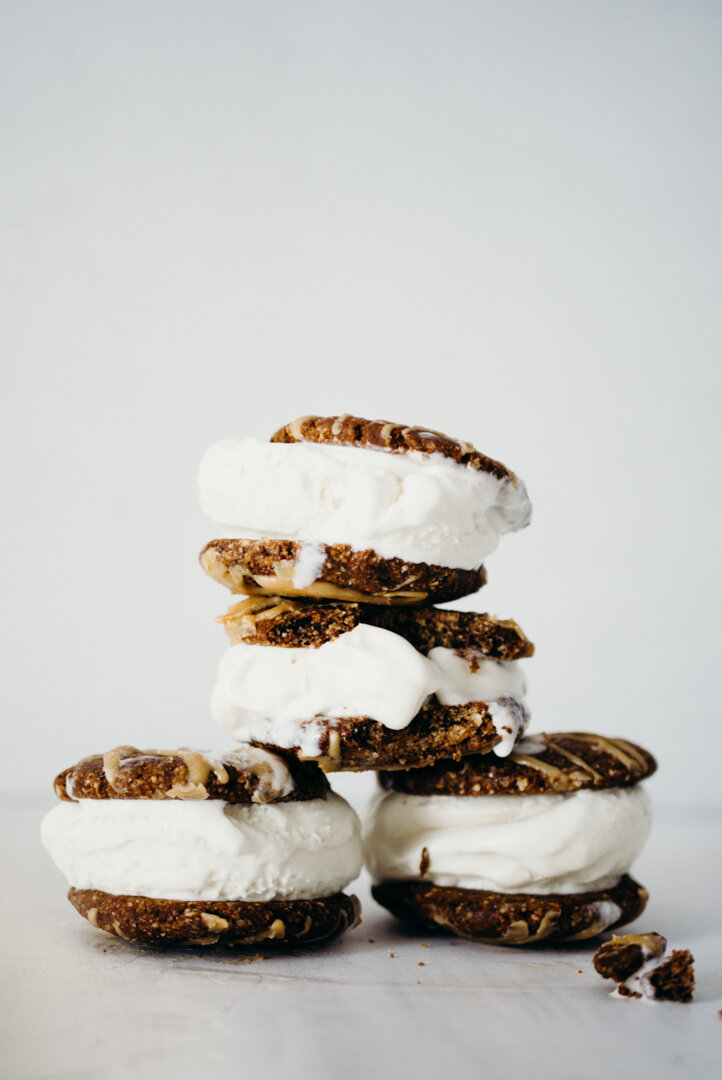
Homemade Chocolate Peanut Butter Drizzle Ice cream Sandwiches // Gluten free & Dairy free

Last week cookie dough trio I decided it was a good idea to team up with another fellow blogger to bring you not one but two beautiful cookie sandwich creations! I teamed up with my friend from Heathers Home Bakery, who also is a fellow lover of all things in the form of a cookie sandwich! Her classic baking methods and use of butter and Flour (jealous) helped her create beautiful Soft Vanilla Cutout Cookies with a Creamy Vanilla Filling that is everything you dream of in a classic vanilla sandwich cookie! The type of cookie that makes you want to throw away those store-bought cookies, put on your favorite apron & choice music, and get to work creating something beautiful and delicious for your family!

IMG951764.jpg

Now on the flip side, we have Chocolate peanut butter drizzle ice cream sandwiches that will rock the socks off of your gluten & dairy-free world! These chocolate peanut butter cookies make for a perfect base for sandwiching sweet vanilla ice cream in between! The drizzle of peanut butter takes these cookies to the next level, but if you think you have to stop at a drizzle, feel free to dip, drizzle or douse these ice cream sandwiched with your desired amount of peanut butter sauce!

Chocolate Peanut Butter Ice Cream Sandwiches

Chocolate Peanut Butter Ice Cream Sandwiches

INGREDIENTS

  • 1 & 1/2 cup gluten-free oat flour*

  • 1/3rd cup smooth peanut butter**

  • 1/4th cup agave

  • 1/4th cup cocoa powder

  • 2 egg whites

  • 1 tsp vanilla

  • Dairy-free Vanilla Ice cream

Peanut Butter Drizzle

  • 1/4th cup Creamy Peanut Butter**

  • 1 Tbsp melted coconut oil

  • 1 Tbsp agave

INSTRUCTIONS

  1. Pre-heat your oven to 350F and grease a cookie sheet.

  2. In a large bowl whisk together your oat flour and cocoa powder

  3. in a separate bowl whisk together the agave, egg whites, and vanilla together.

  4. Combine the wet and the dry ingredients together until fully mixed.

  5. Using an ice cream scoop, make balls of dough and flatten them in the palm of your hand till they are about 1/4th of an inch thick.

  6. You want to make sure these cookies are uniform in shape and size. If you want to you can roll the dough out and use a cookie cutter!

  7. bake the cookies for 10-12 minutes and let cool completely, pop in the freezer while you make the peanut butter drizzle.

  8. For the peanut, butter drizzle combines peanut butter, coconut oil, and agave in a small bowl and drizzle over your chilled cookies.

  9. place in the freezer to set the peanut butter.

  10. Once the peanut butter has sed scoop out your ice cream and sandwiches it between two cookies!

  11. roll in sprinkles or drizzle with more peanut butter, but most importantly grab a few friends and enjoy!

    * To make out flour you simple need to blend gluten-free oats in a blender until a fine powder forms and there are no large pieces of oats. You can make this in large batches for ease in baking.

    ** If you cannot have peanut butter feel free to use sunflower seed butter. Just make sure that is slightly runny & creamy. I suggest buying the trader Joe’s brand or SunButter for getting the right consistency

    Don’t forget to PIN it!

ICE CREAM SANDWICHES PIN.jpg

COOKIE DOUGH BLIZZARD // VEGAN & GLUTEN FREE

That moment when Natalie from feasting on fruit, Britt from the banana diaries and I devised a plan in quarantine to bring more edible cookie dough into the world. Toady we bring to you three incredible cookie dough recipes for your Friday night! So grab a friend, make some cookie dough treats, turn on your favorite 90’s chick flick, and enjoy!

SO get ready for Homemade Cookie Dough Blizzards, Edible Cookie Dough Oreo’s & Healthy Protein Cookie dough!

Check out Natalie’s Cookie Dough Oreo’s HERE

Check out Natalie’s Cookie Dough Oreo’s HERE

For Britt’s Beautiful Edible Healthy Cookie Dough click Here

For Britt’s Beautiful Edible Healthy Cookie Dough click Here

For my recipe I am making a Cookie Dough Blizzard!

Not a milk shake, not a smoothie, not soft serve, but a blizzard.

When it comes to ice cream I am a tried and true expert. I have spent most nights ending my day with a beautiful bowl of slightly melted, chocolate coated ice cream that brings me all the joy! Some fall in love with their mothers baked goods, or their grandmothers homemade pies, but it was my Pas love for ice cream that won me over!

Ice cream was a staple in the house and was acceptable to eat any time of the year. It was also very important that ice cream accompanied any cake, pie, cookie, etc. that came into the house. They were simply friendly additions to a perfect bowl of ice cream.

In the summertime our go to spot was Dairy Queen! It would only open for a few months during the year and we would always make sure to be there the first day it opened!

My dad’s favorite was their soft serve cones, and who could blame him? They are the best around! The second best option was their blizzards! The consistency is thick and creamy, theirs tons of texture and it’s loaded with your favorite goodies like cookie dough, peanut butter cups, etc.

I had o figure out how to get the same texture which wasn’t easy. I tried blending frozen coconut cream, frozen bananas, ice cream and more, but nothing was coming out right. I was watching the Bon Appetite YouTube channel when Clair was making choco tacos. In order to get the ice cream piped into her taco base she simply put the ice cream in a bowl and used a spatula to mix the ice cream until it became like a thick cake batter.

I realized this was exactly what you need to make the frosty consistency at home! You simply need a bowl, spatula, your favorite ice cream & your favorite add ins!

Today I am showing you how to make your own vegan cookie dough blizzard, but feel free to use whatever you want! Get the kids involved, make it a family ordeal and most importantly have fun!

Ingredients

  • 1 Pint Vanilla Ice Cream

  • 1/4th cup Chocolate chips

  • Almond flour

  • agave

  • vanilla

  • sea salt

  • 1/4th cup cacao Nibs

Instruction

  1. In a bowl mix together your almond flour, vanilla, sea salt and agave until fully combined. fold in the chocolate chips.

  2. Using a teaspoon measure scoop the cookie dough and form them into small cookie dough balls and set aside.

  3. Scoop your vanilla ice cream it into a mixing bowl. Mix with a spatula until slightly soften. The ice cream should resemble thick cake like batter.

  4. Gently fold in your cookie dough balls and cacao nibs. If your ice cream is looking runny, place the bowl in the freezer for about 10-15 minutes.

  5. Serve with whipped cream, extra toppings and more chocolate if you want

  6. most importantly, enjoy!

    NOTE

    totally customizable method! You can use whatever ice cream is your favorite and simply fold in your favorite cookies, cake, fudge, nuts, seeds, candy, etc!

    Pssssst! Don’t forger to Pin the recipe!

EDIBLE COOKIE DOUGH 3 WAYS.jpg

RHUBARB PEACH CRISP // GLUTEN FREE & DAIRY FREE

Daniel and I celebrated 5 years as a married couple this last weekend. I could tell you we had all these grand plans of road tripping, hanging out at a cool restaurant, going to a museum, etc. and we did have these plans! Then, we started to think about a few things…First off we live a Dave Ramsey lifestyle and are always looking for ways to save money to better our future. 

LL 107-1.jpg

He never tells you not to enjoy what we have been given, but also to know what you can afford and if possible, live below your means! Daniel and I have found great value in coffee shops, walks, working from home, watching movies, and just plain old talking. 

So we started with going to coffee, which turned into talking, talking about working together, creating recipes, making commercials, etc. We began to discuss our budget and realized what we wanted is to create more together, even if that technically meant working. 

So we came home, devised a plan, and got to work. We laughed and joked with each other, enjoyed good food, got to think creatively, and truly enjoyed our time together. I know this might be one of those scrolls to get the recipe stories, but that’s okay with me. I just want to let you guys know that in life you can make anything fun, and it’s just the way you look at things! In the end, a road trip or a day in the city would have given us the same things that working together did. Don’t feel pressured to not do what you are passionate about, just enjoy doing what you love!

Now this recipe is amazing because Rhubarb is one of my all-time favorite summer vegetables that my mom would grow in her garden. She used to let us pick a stalk and peel the red skin off so we could have them as a snack. The thing is, we always got the stalks of rhubarb accompanied by a small cup of sugar for dipping the rhubarb in. The taste of the rhubarb coated in a layer of sugar was amazing! It wasn’t even one of those moments when kids only used the rhubarb as a vehicle to eat sugar and then the Rhubarb is left behind. We wanted to enjoy them together! 

Unfortunately, Florida and Connecticut are very different states and I have a hard time finding Rhubarb anywhere. Thankfully I was at a local farmers market and found beautiful stalks of Rhubarb just waiting to be made into something delicious! 

So on our fifth anniversary, we made this Rhubarb Peach Crisp for you to enjoy!

LL 107-5.jpg

Ingredients

Filing 

  • 2 1/2 cup peeled & chopped rhubarb

  • 1 cup chopped peaches

  • 2tbsp lemon juice

  • 2 tbsp arrowroot powder

  • 1/2 cup coconut sugar

Crumble

  • 1/2 cup almond flour

  • 1 1/2 cup gluten-free oats

  • 1/2 cup coconut oil

  • 1/4th cup coconut sugar

Instructions

  1. Preheat the oven to 375F and spray a glass pie plate with coconut oil.

  2. Peel your rhubarb so that most of the red skin on the outside comes off. 

  3. Chop up your Rhubarb and peach. In a large bowl, combine your chopped rhubarb and peaches, lemon juice, arrowroot, and 1/2 cup coconut sugar, and set aside.

  4. In a separate mixing bowl combine your almond flour, oats, coconut oil and 1/4th cup coconut sugar until fully mixed and there are no lumps of coconut oil. 

  5. Pour your fruit mixture into your pie plate and use a spatula to spread out the fruit evenly, making sure to cover the whole bottom.  

  6. Crumble your dry mixture on top until well coated. 

  7. Bake in the oven for 35-45 minutes. It should look golden on the top and the fruit should be bubbling, but not burned. 

  8. Let cool for about 20-25 minutes

  9. Serve warm with vanilla & strawberry ice cream and enjoy!

RHUBARB CRISP PIN 1.jpg

Healthy Strawberry Shake // Vegan & Paleo

There’s nothing like strawberries in the summertime! Whether you're covering them in sugar, freezing them in Popsicle molds, or picking them straight from the plant, they are the perfect summer treat!

Well, I was feeling the summer heat here in FL for the last week at we hit the mid-90s, leading me into a desperate attempt to make something refreshing and simple! I looked in my freezer and there it was, a forgotten bag of frozen strawberries just WAITING to be made into something refreshing.

I grabbed the bag and then checked the content of my fridge, almond milk, coconut cream, and dairy-free yogurt all stared back at me and I knew it was time to make a healthy Strawberry milkshake!

This shake is not meant to overload your taste buds with the sugary version of a strawberry, but offer a taste that is both sweet and slightly sour at the same time, making for the perfect summer strawberry!

using unsweetened yogurt is how you get this effect, but if all you have is sweetened yogurt omit the maple syrup. Give it a taste test once blended and dd in the agave if you want to!

If you are like my husband and enjoy sour strawberries omit the maple syrup and sweetened yogurt all together!

LL 107-12-2.jpg

Prep Time: 10 Minutes

Ingredients

  • 1 & 1/4th cup frozen strawberries

  • 1/4th cup almond milk

  • 1/2 cup almond milk yogurt

  • 1/4th cup coconut cream

  • 2 Tbsp. Maple Syrup

Instructions

It’s simple! Add in all of the ingredients into a blender and blend until you have a smooth consistency.

If need be add in a little extra almond milk, but just keep in mind this will alter the taste a bit.

Pour, sip and enjoy!