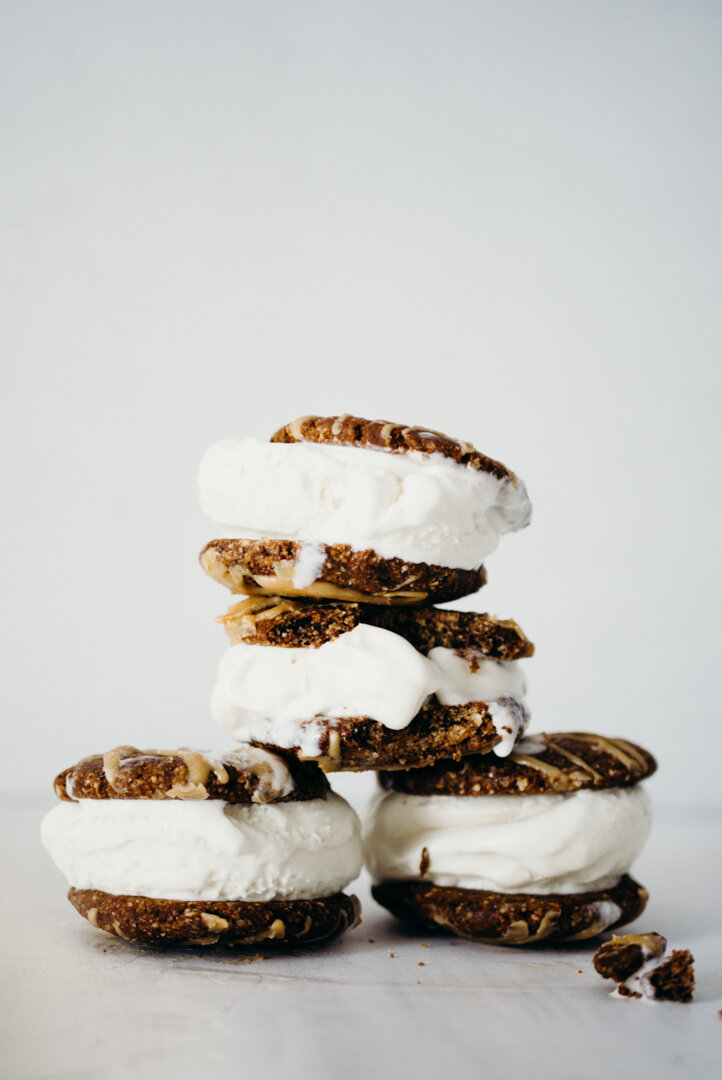
Homemade Chocolate Peanut Butter Drizzle Ice cream Sandwiches // Gluten free & Dairy free

Last week cookie dough trio I decided it was a good idea to team up with another fellow blogger to bring you not one but two beautiful cookie sandwich creations! I teamed up with my friend from Heathers Home Bakery, who also is a fellow lover of all things in the form of a cookie sandwich! Her classic baking methods and use of butter and Flour (jealous) helped her create beautiful Soft Vanilla Cutout Cookies with a Creamy Vanilla Filling that is everything you dream of in a classic vanilla sandwich cookie! The type of cookie that makes you want to throw away those store-bought cookies, put on your favorite apron & choice music, and get to work creating something beautiful and delicious for your family!

IMG951764.jpg

Now on the flip side, we have Chocolate peanut butter drizzle ice cream sandwiches that will rock the socks off of your gluten & dairy-free world! These chocolate peanut butter cookies make for a perfect base for sandwiching sweet vanilla ice cream in between! The drizzle of peanut butter takes these cookies to the next level, but if you think you have to stop at a drizzle, feel free to dip, drizzle or douse these ice cream sandwiched with your desired amount of peanut butter sauce!

Chocolate Peanut Butter Ice Cream Sandwiches

Chocolate Peanut Butter Ice Cream Sandwiches

INGREDIENTS

  • 1 & 1/2 cup gluten-free oat flour*

  • 1/3rd cup smooth peanut butter**

  • 1/4th cup agave

  • 1/4th cup cocoa powder

  • 2 egg whites

  • 1 tsp vanilla

  • Dairy-free Vanilla Ice cream

Peanut Butter Drizzle

  • 1/4th cup Creamy Peanut Butter**

  • 1 Tbsp melted coconut oil

  • 1 Tbsp agave

INSTRUCTIONS

  1. Pre-heat your oven to 350F and grease a cookie sheet.

  2. In a large bowl whisk together your oat flour and cocoa powder

  3. in a separate bowl whisk together the agave, egg whites, and vanilla together.

  4. Combine the wet and the dry ingredients together until fully mixed.

  5. Using an ice cream scoop, make balls of dough and flatten them in the palm of your hand till they are about 1/4th of an inch thick.

  6. You want to make sure these cookies are uniform in shape and size. If you want to you can roll the dough out and use a cookie cutter!

  7. bake the cookies for 10-12 minutes and let cool completely, pop in the freezer while you make the peanut butter drizzle.

  8. For the peanut, butter drizzle combines peanut butter, coconut oil, and agave in a small bowl and drizzle over your chilled cookies.

  9. place in the freezer to set the peanut butter.

  10. Once the peanut butter has sed scoop out your ice cream and sandwiches it between two cookies!

  11. roll in sprinkles or drizzle with more peanut butter, but most importantly grab a few friends and enjoy!

    * To make out flour you simple need to blend gluten-free oats in a blender until a fine powder forms and there are no large pieces of oats. You can make this in large batches for ease in baking.

    ** If you cannot have peanut butter feel free to use sunflower seed butter. Just make sure that is slightly runny & creamy. I suggest buying the trader Joe’s brand or SunButter for getting the right consistency

    Don’t forget to PIN it!

ICE CREAM SANDWICHES PIN.jpg

No-Bake Coconut Cookie Bars

Chocolate is kinda my thing if you haven’t noticed from the presence of chocolate in my recipes. So when I am thinking of a new recipe, that’s usually where I start! Then I think to myself what goes best with chocolate? Well today I had a huge bag of coconut in my cupboard that was just ASKING to be made into a sweet treat!

Now in order for my sweet treats to be accepted into the realm of Sonya’s Open Cupboard they have to be tested and approved by both my nieces, nephews and my husband. All who are equally picky…When I presented these No-Bake Coconut Bars it was a success!

The kids loved them and so did Daniel and my sister, and me, and…well we ate them all so that was as many people I had try them that day!

My favorite part about these bars is that they are a no-bake recipe, that is super easy to make, especially if you are home with little ones! I take care of my nieces and nephews a lot who are all under the age of 10. Keeping things creative with them is super important to me so whenever there is a simple recipe to make with them it’s so much more fun!

The Coconut Cookie layer is great because you get to use your (washed) hands to mix and place in the pan which is great for stimulation!

For the Chocolate layer, you get to teach them about using a double boiler, and how easy it is for the chocolate to burn. This helps them learn precision and the importance of following directions! It also teaches me to be more patient and relaxed with them…so all around it’s a win-win!

LL 107-1.jpg

Coconut Cookie Layer

LL 107-5.jpg
  • 1 cup coconut flour

  • 2/3rd cup shredded coconut

  • 1/4th cup Agave

  • 1/4th cup hemp hearts

  • 1 tsp sea salt

  • 1/3rd cup full fat coconut milk

  • ½ cup sunflower butter

Chocolate Layer

  • 1 cup chocolate chips

  • 2 Tbsp coconut oil

Toppings (optional)

  • Toasted Coconut (see directions below)

Directions

Line an 8x8 Brownie pan with Parchment paper, making sure the paper covers the sides of the pan.

In a bowl whisk together the coconut flour, shredded coconut, hemp hearts & sea salt.

Add in the Coconut Milk, Agave, and Sunflower butter and mix until well combined, using your hands if need be!

Press the dough into the pan evenly, making sure to get the cookie base evenly into every corner!

Freeze the base for about 30 minutes.

While your base is in the freezer, combine your chocolate chips and coconut oil together and melt using a double boiler method. What I do is boil water and put it in a glass bowl, and then place the smaller glass bowl with the chocolate and coconut oil, into the hot water. Making sure the water doesn’t overflow into the small bowl. Make sure you are stirring the chocolate and coconut oil together. Feel free to replace the water with hot water halfway through if need be.

it should take about 5 to 10 minutes to melt the chocolate.

I have found that it is a super gentle way to melt the chocolate, and you end up with more control, especially since the amount of chocolate is small.

Once your chocolate is melted evenly pour evenly on top of the Coconut Cookie base and then place back into the freezer. If you want you can top with toasted coconut**!

After the cookie has been in the freezer for 30 minutes check to see if the chocolate has set. Once the chocolate has set take out, cut into squares and enjoy!

Toasted Coconut**

For the toasted coconut, all you have to do is preheat your oven to 350F

Put your desired amount of coconut on a baking sheet and bake it for about 8-10 minutes, making sure to keep an eye on it to make sure it doesn’t burn.

Let cool and use to top your No-Bake Coconut Cookie Bars!

Vegan & Gluten Free Sugar Cookies

Sugar cookies, no need for chocolate chips in these babes because they hold up on their own! I am a firm believer in the power of a chocolate chip cookie, but my mind has been changed thanks to these babes.

4G8A9923.jpg

My friend Natalie from Feasting on Fruit and I felt the need to fill the heart-shaped sugar cookie void in our lives. Sowe schemed together to create the cutest heart-shaped edible valentines for you, and well for us to enjoy! They are subtly sweet, perfectly crispy, and just the right amount of icing (if you’re into that). Cut them into heart shapes and gift them your valentine, even if it’s only your dog…

The recipe only has six ingredients, ensuring a simple bake that would be easy to take on alone or bake them with your littles. It’s a perfect opportunity to spend time together while teaching them that healthy baking is fun and delicious!

Use the recipe for any holiday, birthday, or events for a simple and crown pleasing treat that will have everyone complimenting you on what cute cookies you have made!

Ingredients

  • 1 cup (120g) almond flour

  • 1/3 cup (40g) coconut flour

  • 1/4 cup (80g) maple syrup or agave

  • 1/4 cup (50g) coconut oil (or coconut oil*)

  • 1 tsp vanilla extract

  • 1/4 tsp salt

Glaze**

  • 1/4 cup coconut butter, melted

  • 1 tsp pitaya powder (pink) or black goji powder (purple)

Instructions

4G8A9534.jpg
  1. Whisk together the maple syrup, coconut oil, and vanilla.

  2. Add the flours and salt. Mix to form a sticky dough.

  3. Roll out between two pieces of wax paper to 1/4-inch thickness.

  4. Chill dough for 15 minutes (optional, but recommended for easier cutting/transferring).

  5. Preheat the oven to 350ºF.

  6. Cut into hearts (or any shape!), and transfer to a baking sheet lined with parchment paper.

  7. Bake for 8-10 minutes until just golden around the edges. It will take less time for smaller cookies.

  8. Cool completely before glazing.

  9. Whisk together glaze ingredients, adding more or less powder to the desired color.

  10. Top cooled cookies with glaze and sprinkles. Chill until set.

  11. Eat!


Notes

*You may need to increase to 1/3 cup since it is thicker, it also helps to melt it before mixing.

**They are delicious plain or drizzled/dipped in melted chocolate.

PIN IT!

4G8A9905.jpg
4G8A9906.jpg

Ginger Molasses Cookies // Gluten & Dairy Free

IMG_9890.jpg

I don’t know about you but when it comes to getting creative, it’s always better with a friend! Recently I have been chatting with a new friend from a little blog called The Banana Diaries! Her name is Britt and has a real talent for making things taste and look amazing, not to mention that she is super outgoing and matches my energy level to a tee!

We have been talking about collaboration on a recipe together and we decided that today would be the day! Well, we decided a few weeks ago and then put in the work, and THEN posted about it today…Anyway, we decided it would be best to make cookies, and since it’s the holiday season we instantly thought soft-baked ginger and molasses cookies! Sturdy enough to withstand a dunk in milk, easy for any baker, and so delicious you don’t even realize they are gluten-free, dairy-free, and vegan-friendly!

SO after a little bit of creativity in the kitchen and using our trusty cameras, we are delighted to bring to you Ginger Molasses Cookies!

Ingredients

IMG_9886.jpg
  • 3/4th cup Cassava flour

  • 1/4th cup Coconut flour

  • 1/2 cup Coconut oil

  • 1/4th cup unsweetened Apple Sauce

  • 1/3rd cup Maple or Coconut sugar

  • 1/3rd cup Molasses

  • 1 egg + 1 Egg White OR 3Tbsp ground flax + 1/3rd cup Water

  • 2tsp Ginger

  • 3Tbsp Apple Cider Vinegar

  • 3tsp Baking Soda

Directions

  • Preheat the oven to 350 F and line a baking sheet with parchment paper

  • Cream together the coconut oil and maple sugar using a hand mixer if available.

  • Add in the molasses & applesauce, and continue to mix until smooth.

  • Add int he apple cider vinegar, baking soda, and ginger and continue to mix.

  • fold in the eggs until well combined, then sift in the cassava flour and coconut flour, mixing until a sticky batter forms.

  • Chill the batter for about 1 hour.

  • Using a Tablespoon Measure or Spoon scoop about 1” balls of batter onto the baking sheet, spacing about 1-2 inches apart.

  • bake for 10-12 minutes and let cool.

  • Serve to your friends and enjoy your perfectly baked homemade cookies!

    Thank you for stopping by! Let us know how you enjoyed the cookies by leaving a comment below or spread the love by living this post! But before you go, make sure to show some love to Britt from The Banana Diaries because this wouldn’t have been possible without her!

    Remember! There is strength in numbers, so go create something awesome, and go do it with a friend!

    Love always,

    Sonya Peacocke!

IMG_9830.jpg