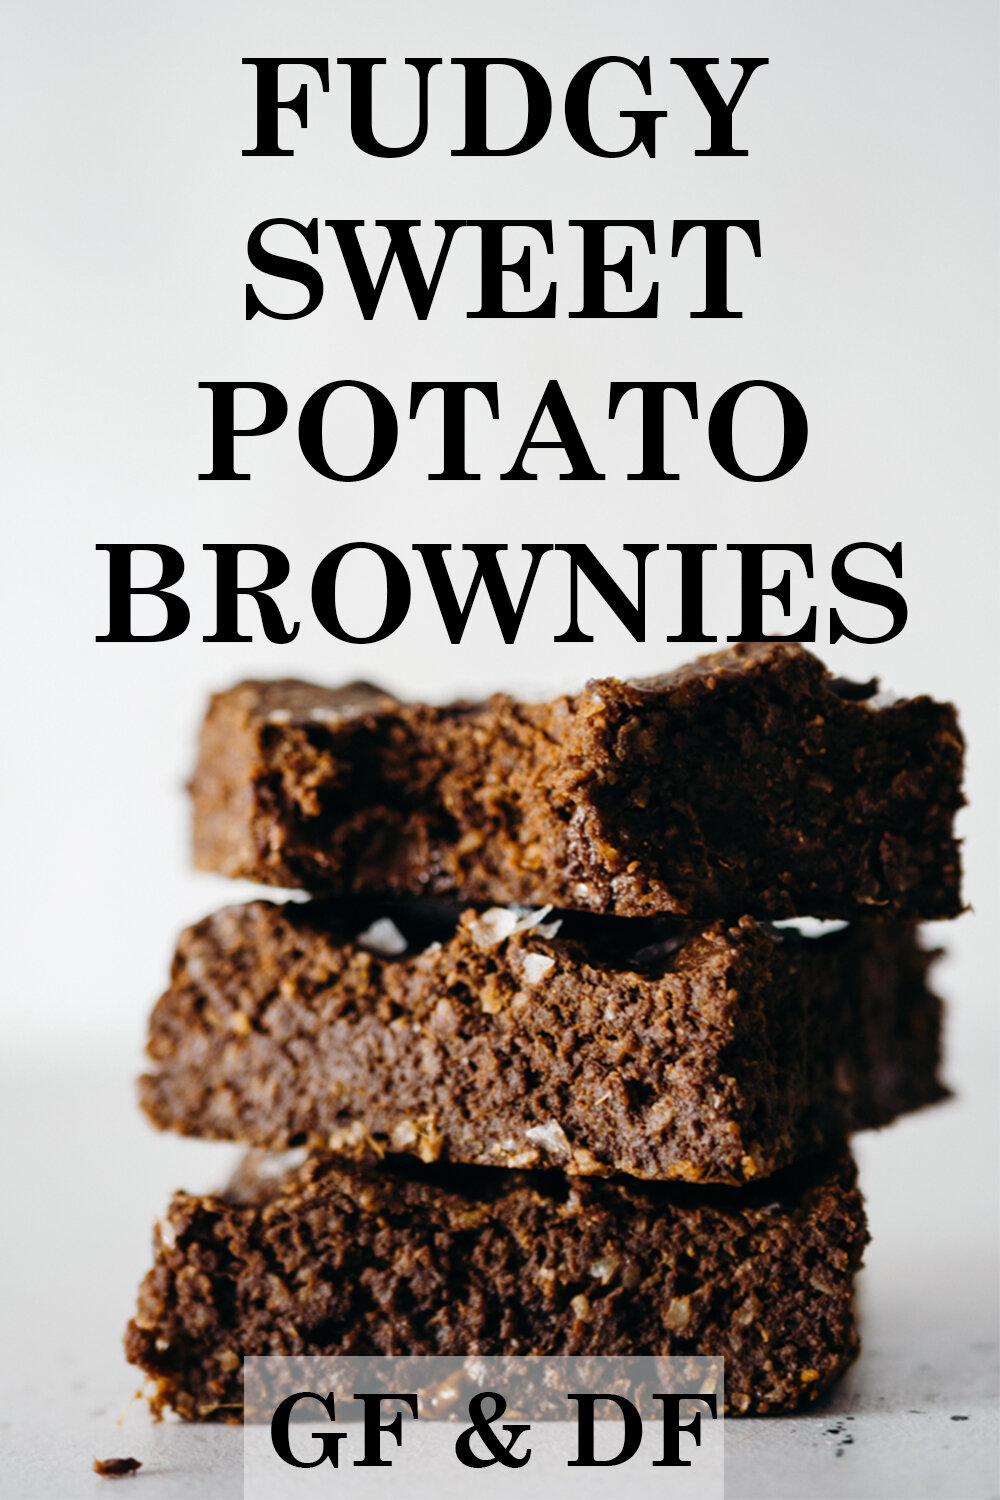
FUDGY SWEET POTATO BROWNIES // GLUTEN FREE & DAIRY FREE

Okay, so what you guys might not know is that I don’t like to follow the rules when it comes to baking and cooking, it’s one of the reasons why half of what I make doesn’t get to the bog, but today was different. I didn’t follow the rules exactly, I used sweet potato puree and made my flour, but then I did my research and followed some more traditional methods. I did use melted chocolate and cocoa powder, I didn’t overbeat the eggs, I used almost regular sugar, etc. And let me tell you, it worked like a charm!

These are healthy-ish because they are gluten-free, dairy-free, and have a bonus root vegetable in there which I can’t complain about. Thankfully these brownies are better than healthy brownies, there are real brownies with real ingredients for a great taste! the benefit of making brownies this way is that you get the bonus of healthier ingredients while also satisfying your sweet tooth bot emotionally and physically. 

These are fudgy decadent brownies with real chunks of chocolate and a drizzle of coconut caramel icing that is sure to make even the pickiest of eaters happy! 

Ingredients

Brownies

  • 1 cup sweet potato puree

  • 1 cup gluten-free oats (or 3/4th cup oat flour)

  • 1/2 cup cocoa powder

  • 1/4th cup coconut oil

  • 1/4th cup coconut sugar

  • 2 eggs

  • 1 tsp sea salt

  • 1tp vanilla

  • 3/4th cup chocolate chips

Coconut Caramel Icing

  • 1 Can of full-fat coconut milk

  • 1/4th cup coconut sugar

Directions

  1. Preheat your oven to 350F and line an 8x8 pan with parchment paper. 

  2. In a blender pour in your oats and blend until a flour forms. It won’t fill your one cup measure once blended, but don’t worry about that. 

  3. In a small bowl combine 1/2 cup chocolate chips & coconut oil. Using the double boiler method melt your chocolate.

  4. Pour your melted chocolate into a large bowl. Whisk in your sugar and then your eggs, vanilla, and sweet potato puree. 

  5. Whisk in your sea salt, cocoa powder, and oat flour. 

  6. fold in the extra 1/4th cup of chocolate chips.

  7. spray your pan and pour in the brownie mixture. Smooth and sprinkle with flaky salt (optional)

  8. Bake at 350F for 25-30 minutes. To see if the brownies are done stick a toothpick into the brownies. If the toothpick comes out clean your brownies are good to go! 

  9. Let cool and enjoy! 

For the Coconut Icing

NOTE: Do not shake your can of coconut milk. You need the fatty liquid to be separated from the more watery liquid in the can of coconut milk. 

  1. In a small pan pour in your separated coconut cream and coconut sugar and whisk together over medium heat.

  2. Bring your mixture to a simmer and let cook for 5 to 10 minutes, stirring consistently. 

  3. Your mixture should reduce to about half and turn a light tan color. you do not want to make caramel or burn the liquid so keep a close eye on it.

  4. Once it is done, remove from heat and pour into a glass container to cool. 

  5. Drizzle over brownies & store excess in the fridge. 

Don’t forget to PIN it!

SWEET POTATO BROWNIES PIN 2.jpg

Tahini Energy Bites // Gluten Free & Dairy Free // Vegan Optional

Staying at home has its ups and downs, on one hand, it’s awesome because I don’t have to put on makeup all day! On the other hand, I have to make sure I have snacks and dessert ready in a moment’s notice to satisfy all the hunger and cravings. This has been kind of annoying, because it feels like I am a teenager again, with minimal responsibility and a lot of time filling my time with random activities. The thing is when I was a teenager the snacks just appeared after every Thursday when my parents would grocery shop…But obviously I am an adult now and have to provide for myself.

Thankfully being an adult means getting to make whatever you want, and since I am a firm believer that snacks and dessert have the ability to be totally interchangeable good things happened in the kitchen this week.

Behold, I bring to you, Tahini Energy Bites. They taste like dessert, but totally can pass as healthy snacks! They are packed with protein & healthy fats from the nut butter, collagen & hemp hearts! All while offering you a tasty treat that has the perfect balance of sweet & bitter from the dates & cacao!

You can make a whole bunch of these and store them in the freezer for whenever your feeling peckish so don’t be shy! Double or triple the batch, either way, you won’t be sorry!

Ingredients

  • 1 cup Pitted Dates

  • 1/4th cup Hemp Hearts

  • 1/2 cup Tahini

  • 2 Tbsp Cacao Nibs

  • 2 Tbsp Almond Milk

  • 1/4th tsp Sea Salt

  • 2 scoops Collagen (optional)

Directions

In a food processor or a high-speed blender combine all of the ingredients except for the almond milk.

Blend on high until well combined. Add in your almond milk and then blend for about 1-2 minutes longer, until combined.

Roll into balls, coat in hemp hearts, and then store in the freezer!

Eat whenever pleases you & enjoy them!

TAHINI BITES PIN.jpg

Dairy Free Frozen Yogurt Bars

I don’t know about you, but today was one of those days where I just didn’t want to drive to the grocery store. YOu might ask “Sonya, isn’t that your job?” Well yes, it is my job to think up recipes, but the products, and then we’ll give you a new product, but who says you can’t get a little creative with what you have at home!
So today I bring you THE BEST frozen yogurt bars because the best things always happen when you are forced into being creative! lazy =’s success!…at least, some of the time.

LL 107-11.jpg

I made these thinking it would be a tested recipe, but once they came out of the freezer and saw that they were both beautiful and delicious, I knew there was no use tweaking the recipe.

I used WHole foods Dairy-free almond milk yogurt because it is one of the cheaper options out there, without having a million ingredients or hoards of sugar added! I will add the sugar on my own, thank you very much!

I also used a 60% dark chocolate bar which didn’t melt as well as the enjoy life chocolate chips, but I think worked better for the recipe anyway! Having the ribbons of thick chocolate and almond butter with the combination of the sweet/tart blackberries and the crunchy texture of the sunflower seeds were everyyythinggg. Not to mention the flavor combination of dark chocolate, almond butter and blackberries is an opportunity we are missing out on!

SO without further delay, let this ice-cream loving, frozen yogurt convert teach you how to make frozen yogurt!

LL 107-10.jpg

Makes: 9 Servings

Total TIme: 3 &1/2 - 5 & 1/2 hours

Assemble time: 30 minutes

Freeze time: 3 & 1/2 hours

Ingredients: 8

Ingredients

                Base

·         2 cups Dairy free plain yogurt

·         1/4th cup syrup or agave

·         1 tsp vanilla extract


Toppings

·         Blackberries

·         1/4th cup Dairy free chocolate

·         2 tbsp. coconut cream

·         1/4th cup almond butter

·         2 tbsp. sunflower seeds

Directions

Line an 8x8 baking pan with parchment paper so all the sides are covered as to prevent leaks, and set aside.

Combine the yogurt, syrup, and vanilla together and then pour into the lined pan. Drizzle in the almond butter and Berries and put in the freezer. This will allow your toppings to set a bit before adding more so they don’t all mix together.

Using the double boiler method, melt together the dark chocolate and coconut cream together until smooth. Take the pan out of the freezer and drizzle the chocolate sauce on top. Sprinkle with sunflower seeds and then freeze for at least 3 hours.

Take out of the freezer and enjoy immediately!

Don’t forget to pin it!

Healthy Gluten & Dairy-free Chocolate Chunk Oatmeal Cookies

Something urged me to make oatmeal cookies this week, I don’t know if it was the fact that I had an abundance of oats in my house, or I just wanted something sweet to dunk in my morning coffee! Who knows, probably both!

Anyway, I just wanted to bring you a simple and easy recipe that will fill your bellies with something wholesome and sweet!

These cookies are made gluten-free by using gluten-Free oats which you can find at your local grocery store, or online. I buy mine at Trader Joe’s because you get a lot for what you pay for!

When it came to the chocolate I didn’t have any chocolate chips on hand, so I just chopped up a chocolate bar! I love doing this because the chocolate bars I buy are always at least 65% dark chocolate, making them usually dairy-free! So if you like things less sweet, go for the dark chocolate trick, but if not go for some dairy-free chocolate chips! Either way, you won’t be sorry you made these bad boys!

LL 107-14.jpg

Time: 30-35 minutes

Makes about 12 cookies

Ingredients

  • 1 cup GF oat flour

  • 1 cup GF whole oats

  • 1 tsp baking powder

  • 1/4th tsp salt

  • 1tsp cinnamon

  • 1/3rd cup coconut sugar  

  • 2 large eggs

  • 1/4th cup coconut oil

  • 1/4th cup almond milk

  • ½ cup dairy-free chocolate chips (or chunks)

Instructions

Preheat your oven to 350F and prepare your baking sheet.

Whisk together the dry ingredients and then whisk in the wet ingredients until a batter forms.

Gently fold the chocolate into the batter.

Scoop the dough into 1 inch balls using an ice cream scoop and place on the prepared baking sheet about 1 to 2 inches apart.

Place in oven and bake for 22-25 minutes.

Let cool on a cooling rack for about 15 minutes and enjoy!

Psst….dont forget to pin it!

Paleo Zucchini Bread // GLuten-Free & Dairy-Free

I don’t know about you, but when It comes to Zucchini Bread I take things VERY seriously. Zucchini bread is one of those foods that is a win-win for both adult and child. Offering a sweet bread that kids and adults love while sneaking in some much appreciated green vegetables! Now even though it’s a winner, some of the more traditional recipes usually call for a good amount of gluten, dairy, sugar, etc. that usually put the zucchinis hard work down.

I was trying to figure out a way to make zucchini bread healthier without taking away all the good things it had to go for it. Things like a perfectly moist (don’t you just love that word?) and its sweet caramel taste!

Well, I have done it, folks, this Zucchini bread is Refines sugar-free, dairy free, gluten free, and can be made without oil if you substitute it for Applesauce! So here’s the recipe you and your taste buds have been missing out on!

Ingredients

• 1 &1/4th cup Almond Flour

• 1/3rd cup Coconut Flour

• 1 & 1/2 Cup Shredded Zucchini

• 6 Soaked Dates

• 3 large Eggs

• 1/4th Apple Sauce of Coconut oil

• 1 tsp Vanilla

• 1 & ½ tsp Baking Powder

• 1 & ½ tsp Cinnamon

• 1 tsp Maca root powder (optional, but gives the recipe more caramel flavors)

• Pinch of salt

Instructions

Soak the dates in hot water for about 10-15 minutes and then drain

Put the Zucchini, Melted Coconut oil, Dates, Eggs, and Vanilla in a blender or food processor and blend until liquid.

Mix together the dry ingredients and then combine with the Liquid Mixture. Put in a bread tin and sprinkle cinnamon and coconut sugar or cacao nibs on top!

Bake in the oven at 350 F for to 45-55 Minutes.

Let cool for about an hour and then enjoy!

Thanks for stopping by!

- Sonya Expert Zucchini Bread Baker.

pin it!

Vegan & Gluten Free Sugar Cookies

Sugar cookies, no need for chocolate chips in these babes because they hold up on their own! I am a firm believer in the power of a chocolate chip cookie, but my mind has been changed thanks to these babes.

4G8A9923.jpg

My friend Natalie from Feasting on Fruit and I felt the need to fill the heart-shaped sugar cookie void in our lives. Sowe schemed together to create the cutest heart-shaped edible valentines for you, and well for us to enjoy! They are subtly sweet, perfectly crispy, and just the right amount of icing (if you’re into that). Cut them into heart shapes and gift them your valentine, even if it’s only your dog…

The recipe only has six ingredients, ensuring a simple bake that would be easy to take on alone or bake them with your littles. It’s a perfect opportunity to spend time together while teaching them that healthy baking is fun and delicious!

Use the recipe for any holiday, birthday, or events for a simple and crown pleasing treat that will have everyone complimenting you on what cute cookies you have made!

Ingredients

  • 1 cup (120g) almond flour

  • 1/3 cup (40g) coconut flour

  • 1/4 cup (80g) maple syrup or agave

  • 1/4 cup (50g) coconut oil (or coconut oil*)

  • 1 tsp vanilla extract

  • 1/4 tsp salt

Glaze**

  • 1/4 cup coconut butter, melted

  • 1 tsp pitaya powder (pink) or black goji powder (purple)

Instructions

4G8A9534.jpg
  1. Whisk together the maple syrup, coconut oil, and vanilla.

  2. Add the flours and salt. Mix to form a sticky dough.

  3. Roll out between two pieces of wax paper to 1/4-inch thickness.

  4. Chill dough for 15 minutes (optional, but recommended for easier cutting/transferring).

  5. Preheat the oven to 350ºF.

  6. Cut into hearts (or any shape!), and transfer to a baking sheet lined with parchment paper.

  7. Bake for 8-10 minutes until just golden around the edges. It will take less time for smaller cookies.

  8. Cool completely before glazing.

  9. Whisk together glaze ingredients, adding more or less powder to the desired color.

  10. Top cooled cookies with glaze and sprinkles. Chill until set.

  11. Eat!


Notes

*You may need to increase to 1/3 cup since it is thicker, it also helps to melt it before mixing.

**They are delicious plain or drizzled/dipped in melted chocolate.

PIN IT!

4G8A9905.jpg
4G8A9906.jpg